Raúl Gonzalez
Yedek Oyuncu

Mesaj Sayısı : 134
Puan : 6753
Rep : 408
Yer : Ankara
Cinsiyet : 
Kayıt tarihi : 27/07/09
 | | Konu: Reo | Tactics | 4-2-3-1 Ptsi Ağus. 17, 2009 4:58 am | |
| - Alıntı :
- NOTE: You will have to update these tactics with the current posted team instructions below. Although minimal, I will update the zips with my final release which should be soon. If you have any questions on what to do, feel free to ask. The process should be as follows.
- Go to team instructions.
- Remove target man tag.
- - -
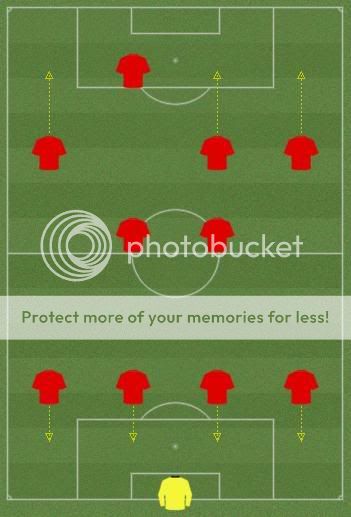
Reo: Tactics
Set 1: 4-2-3-1
Version: 1.5
NOTE: The code tag isn't formatting properly. You'll find all necessary information in the readme. This post may look different to the one on the SI forums.
Formation's Origin
Quoted from Wikipedia . . .
This formation is also currently used by Brazil as an alternative to the 4-2-4 formation of late 50's to 1970. Implemented similarly to how original 4-2-4 was used back then, use of this formation in this manner is very offensive, creating a 6-man attack and a six-man defence tactical layout. The front 4 attackers are composed as wide forwards and playmaker forward in support of a target striker in front.
Reference: [url="http://en.wikipedia.org/wiki/Formation_(football)#4-2-3-1"]http://en.wikipedia.org/wiki/Formation_(football)#4-2-3-1[/url]
Player Roles
Pyramid
2 defend, 2 support, 6 attack

Attacking
2 defend, 2 support, 6 attack

Control
2 defend, 4 support, 4 attack

Balanced
3 defend, 4 support, 3 attack

Counter
4 defend, 3 support, 3 attack
Defensive
5 defend, 4 support, 1 attack

Shut Up Shop
6 defend, 3 support, 1 attack

Tactics Wizard
You'll find an excel file with this information in the zip as well.

Player Requirements
I’ve included filters in the zip that’ll help you find the players you’ll need.
NOTE: These settings are for top flight clubs. If you're playing with a lower league squad, you'll need to adjust them to your league specifications. For example, high pace, passing, acceleration, and a few other attributes won't be required for particular templates. This is just what I used with a top flight club. My goal with the filters was to give you 10-20 players to choose from who could play within the formation.
GK: Sweeping Keeper
NOTE: If you’re using a lower league side, I’d recommend dropping creative freedom.
- Aerial Ability
- Command of Area
- Communication
- Handling
- Reflexes
- One on Ones
- Rushing Out
- Acceleration
- Pace
- Anticipation
- Positioning
- Decisions
- First Touch
- Jumping
- Bravery
- Agility
- Concentration
FB: Attacking Fullbacks
NOTE: If you’re using a lower league side, I’d recommend dropping creative freedom.
- Positioning
- Tackling
- Pace
- Anticipation
- Dribbling
- Crossing
- Acceleration
- Flair
- Creativity
- Off the ball
- Decisions
- Teamwork
- Passing
- Concentration
- Strength
- Jumping
- Bravery
CB: Center Backs
NOTE: If you notice that players are getting behind your defensive line, try dropping the defensive line a couple notches.
- Tackling
- Jumping
- Positioning
- Heading
- Teamwork
- Marking
- Strength
- Bravery
- Passing
- Acceleration
- Pace
- Concentration
- Anticipation
- Decisions
- Influence
- Determination
- Work Rate
MC/d: Box to Box Midfielders
NOTE: Finishing and long shots are a bonus in this position. If your player doesn't have finishing and long shots, lower long shots to rarely. If you’re using a lower league side, I’d recommend dropping creative freedom as well.
- Passing
- Tackling
- Dribbling
- Work Rate
- Stamina
- Positioning
- Strength
- Anticipation
- Jumping
MC/a: Deep Lying Playmaker
NOTE: Finishing and long shots are a bonus in this position. If your player doesn't have finishing and long shots, lower long shots to rarely. If you’re using a lower league side, I’d recommend dropping creative freedom as well.
- Passing
- Creativity
- Technique
- Composure
- Decisions
- Positioning
- Teamwork
- Work Rate
- Long Shots
- Flair
- Tackling
- Stamina
- Strength
AMC, AML, AMR: Attacking Midfielders
NOTE: Some quick strikers have the attributes to play these positions. If they are right footed, I'll have them play AML. If they are left footed, I'll have them play AMC or AMR. These players are on free roles with 3/4 creative freedom. You'll find them making a number of angled runs towards goal. If you’re using a lower league side, I’d recommend dropping creative freedom.
- Passing
- Creativity
- Decisions
- Off the Ball
- Technique
- Dribbling
- Acceleration
- Pace
- Finishing
- Long Shots
- Crossing
- Flair
- Composure
- First Touch
ST: Quick Strikers, Poachers, or Strong Strikers
Quick Strikers:
NOTE: If using a quick striker, you'll have to switch target man supply to feet. If he has at least 15 jumping, you can keep it at mixed. If you’re using a lower league side, I’d recommend dropping creative freedom as well.
- Acceleration
- Dribbling
- Finishing
- Technique
- Pace
- Off the Ball
- Passing
- Composure
- Flair
- Creativity
- Long Shots
- First Touch
- Decisions
- Crossing
- Teamwork
- Anticipation
Poachers:
NOTE: If using a poacher without at least 15 jumping, you'll have to switch target man supply to feet. If you’re using a lower league side, I’d recommend dropping creative freedom as well.
- Jumping
- Heading
- Off the Ball
- Strength
- Acceleration
- Pace
- Technique
- Finishing
- Passing
- Dribbling
- Composure
- Flair
- Creativity
- Long Shots
- First Touch
- Decisions
- Crossing
- Teamwork
- Anticipation
- Bravery
Strong Strikers:
NOTE: If you notice that your player isn’t retrieving the run onto balls, switch target man supply to head instead of mixed. If you’re using a lower league side, I’d recommend dropping creative freedom as well.
- Jumping
- Heading
- Off the Ball
- Strength
- Finishing
- Passing
- Composure
- Long Shots
- First Touch
- Teamwork
- Anticipation
- Bravery
- Flair
- Creativity
- Technique
- Dribbling
- Crossing
Team Instructions
- Do not assign anyone the target man or playmaker tag.
- Make sure your best header is the DCR.
- I use in-swinging corner crosses. For example, left foot corner taker on the right.
Training
I’ve included training schedules in the zip along with staff filters.
NOTE: The training schedules readme will show you how I broke down the attributes. The readme for staff filters will show you how to calculate for seven star coaches. I also want to mention that the training schedules are workload optimized.
Implied Probability
We’ll use implied probability to determine what tactic to use at the start of a game.
How is it calculated?

Arsenal: 6/(1+6) = 85.7%
Draw: 1/(5+1) = 16.7%
West Brom: 1/(10+1) = 09.0%
If you’re controlling Arsenal, use the attacking tactic. If you’re controlling West Brom, use the defensive tactic. Arsenal is a heavy favorite which means they should be aggressive.
A few examples . . .

Arsenal: 4/(5+4) = 44.4%
Draw: 5/(11+5) = 31.3%
Inter: 4/(7+4) = 36.4%
If you’re controlling Arsenal, use the balanced tactic. If you notice that Inter is going defensive instead of balanced, use the control tactic. If you’re controlling Inter, use the counter or defensive tactic. If you feel you’ve been slighted by the odds, start balanced. I wouldn’t recommend it at the Emirates though.

Everton: 1/(4+1) = 20.0%
Draw: 2/(5+2) = 28.6%
Arsenal: 7/(4+7) = 63.6%
If you’re controlling Everton, use the defensive tactic. If you’re controlling Arsenal, use the attacking tactic. One way to use different waves of attacking mentality is start the game on control and ease into attacking tactic. I’ll do this if I’m away and feel the other side is better than projected.
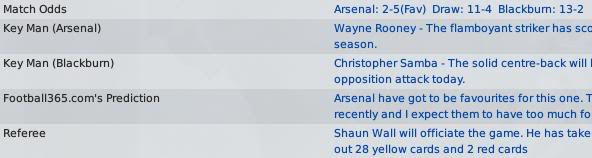
Arsenal: 5/(2+5) = 71.4%
Draw: 4/(11+4) = 26.7%
Blackburn: 2/(13+2) = 13.3%
If you’re controlling Arsenal, use the attacking tactic. If you’re controlling Blackburn, use the defensive tactic.
Opposition Instructions
MC/d or DMC
Tight Marking: No Specific Instructions
Closing Down: Always
Tackling: No Instructions
Show Onto Foot: Weak Foot
MC/a or AMC
NOTE: You want to have your DMC or MC/d man mark the opposition’s MC/a or AMC. If they are playing a 4-4-1-1, assign him the AMC.
Tight Marking: Always (only on AMC)
Closing Down: No Specific Instructions
Tackling: No Specific Instructions
Show Onto Foot: No Specific Instructions
Quick Creative Wingers w/ Technical Ability
Tight Marking: Always
Closing Down: Never
Tackling: Easy
Show Onto Foot: Outside
Slow Creative Wingers w/ Technical Ability
Tight Marking: Always
Closing Down: Always
Tackling: Easy
Show Onto Foot: Outside
Quick Non-Creative Wingers w/ Technical Ability
Tight Marking: Always
Closing Down: Never
Tackling: Easy
Show Onto Foot: Outside
Slow Non-Creative Wingers w/ Technical Ability
Tight Marking: Always
Closing Down: Always
Tackling: Easy
Show Onto Foot: Inside
Quick Creative Wingers w/o Technical Ability
Tight Marking: Always
Closing Down: Never
Tackling: Hard
Show Onto Foot: Outside
Slow Creative Wingers w/o Technical Ability
Tight Marking: Always
Closing Down: Always
Tackling: Hard
Show Onto Foot: Outside
Quick Non-Creative Wingers w/o Technical Ability
Tight Marking: Always
Closing Down: Never
Tackling: Hard
Show Onto Foot: Outside
Slow Non-Creative Wingers w/o Technical Ability
Tight Marking: Always
Closing Down: Always
Tackling: Hard
Show Onto Foot: Inside
Strong Strikers w/ Technical Ability
Tight Marking: Always
Closing Down: Always
Tackling: Easy
Show Onto Foot: No Specific Instructions
Quick Strikers w/ Technical Ability
Tight Marking: Always
Closing Down: Never
Tackling: Easy
Show Onto Foot: No Specific Instructions
Strong Strikers w/o Technical Ability
Tight Marking: Always
Closing Down: Always
Tackling: No Specific Instructions
Show Onto Foot: No Specific Instructions
Quick Strikers w/o Technical Ability
Tight Marking: Always
Closing Down: Never
Tackling: No Specific Instructions
Show Onto Foot: No Specific Instructions
Results
2008/09:

2009/10:

Although I won the league two years in a row, I wasn't happy with how many goals I was allowing per game. Instead of around 0.5, I was averaging around 0.8. This prompted me to change my closing down settings as well as a few roles.
2010/11:

As you can see, I went undefeated with a 30+ goal difference compared to last year.
These tactics were used in a network game. Below is an image of the game status screen.


Download
| |
|

